We were planning to extend wood flooring into the tiny bathroom of our tiny apartment, even though Amanda and I were both a little apprehensive about having all the water from the bathroom on wood floors. The call from our friend Scott Ruppert changed that.
“I assume you’re planning to use the rest of the tile to do the bathroom,” Scott said. No, we weren’t, but once he mentioned it, it made a lot of sense. He had just finished laying out the little square of 14-inch ceramic tiles that will form the base for our wood stove (you need a non-combustible surface under most stoves, including ours), and he had a good bit of tile left over.
Sure, we said, let’s do it. The problem was that the remaining tile we had on hand (a discontinued close-out purchase) isn’t quite enough to cover the bathroom floor. So Amanda and I stopped at Jenkins Brick Friday morning on our way to the farm and bought a few squares of 2-inch square natural stone mosaic.
Acting on Scott’s suggestion we also stopped at Home Depot and purchased grout. Who knew there were so many choices for grout color? Amanda settled on something called Haystack, a light taupe a tad darker than the tiles, which we hope will harmonize with the pallet of other colors in the apartment and will not show dirt the way a lighter color grout would.
 Yesterday morning Amanda sat on our new wood floor and used her garden shears (fresh from harvesting okra) to cut the mosaic into strips, carefully designing where she wanted each stone in relation to its neighbors (whites with darks, greys with browns, etc.).
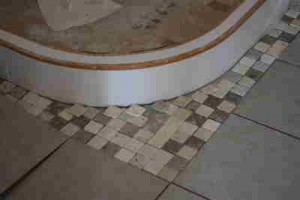
 While she did this I worked in my socks (we want at least to limit gouging and scratching our floors while they’re new) and laid out the mosaic tiles and the 14-inch tiles in the bathroom.
Arranging tile of two different types in a tiny space like that is a little like nailing Jello to the wall; it’s hard to know where to start, especially when the sweat is rolling off your forehead and keeping the tile slippery. First we started at the doorway, but then we realized that the corner shower is really the visual focal point of the room, so that’s the place where the tile needs to look symmetrical.
So we slowly laid out the mosaic tiles in a double row on both the straight sides of the curved shower and extended those straight double rows until they met in the middle of the room. We then arranged the 14-inch tiles from that square and used them to cover most of the bathroom surface. The bathroom is only 36 square feet including the shower, so it didn’t take a lot of the 14-inchers. We finished off with a row of three mosaics on one wall and two mosaics on the other.
 We took turns admiring the finished product, which Scott is planning to install Monday. We like to think the tile will lend another little touch of class to our humble pole barn apartment.
Today – GARBAGE!